Level 3 homework marches on, and it occurred to me after I’d decided to spin a three-ply silk noil for weft, that I’d already decided to spin up a two-ply mawata skein for the same part of the homework. In fact, I’d already drafted out six mawata and wrapped them around two nostepinne, just waiting for me to spin them. And I’d even put the nostepinne in the bin’o’homework’stuff that was here at the suite, and not at the storage unit! Well, how lucky. I immediately ditched the idea of the three-ply noil (for this skein), and proceeded to spin up the mawata.
First, let me say that if you draft mawata and store them on nostepinne, it’s probably best to spin them within a day or two. Don’t let them sit there and meld together, get bumped around and compressed, or you might just end up doing what I did and wasting the better part of one whole mawata and having to draft out another. But spin them I did, and the yarn itself actually turned out quite nice (if I do say so myself), and then it was time to try out the pin loom that my dad made for me.
First I just put in fifteen nails per side and wrapped the silk for warp around them, then attempted to use a crochet hook and a makeshift paper stick shuttle to do a plain weave. It looked awful, and I was going to run out of weft yarn well before the three inch mark. I pulled it all apart, and looked up proper instructions for using a pin loom. It looked fairly easy, so I set up the loom as the directions said, and wove.

You know the reason that we all have lots of knitting needles in different sizes, or different spinning wheels or spindles? It’s because we know that we need to match the right tools to the right job. There was a little problem with the pin loom that Dad made for me. It works perfectly, but for a lot heavier-weight yarn than the silk that I spun.
Now I faced a conundrum. I needed to weave a 3″ square out of these two yarns, somehow. My rigid heddle loom, which I kept out and is in the storage unit, could work, but I would need a lot more yarn for my little square. The pin loom obviously wasn’t going to work, and I only had the supplies that I had brought with me, and what I could possibly scrounge. Luckily, a little bit of searching on Google led me to this tutorial on how to make a cardboard loom, and as luck would have it, we had a cardboard box sitting in our recycling bag, waiting to be taken to the curb. A night’s work and some very sore fingers later (no hammer or really tools of any kind meant that I was pushing the nail through the cardboard by hand to ‘pre-drill’ the holes), I had a little 3″ square loom ready to go.
Macgyvering this loom together meant making do with what I had. A nail to pierce both pieces of cardboard, corrugated cardboard recycled from a shipping box, a short yarn needle, and the thin acrylic yarn I use to tie my final skeins are not the most ideal construction supplies for the loom, but they’re what I had, and it worked well enough.
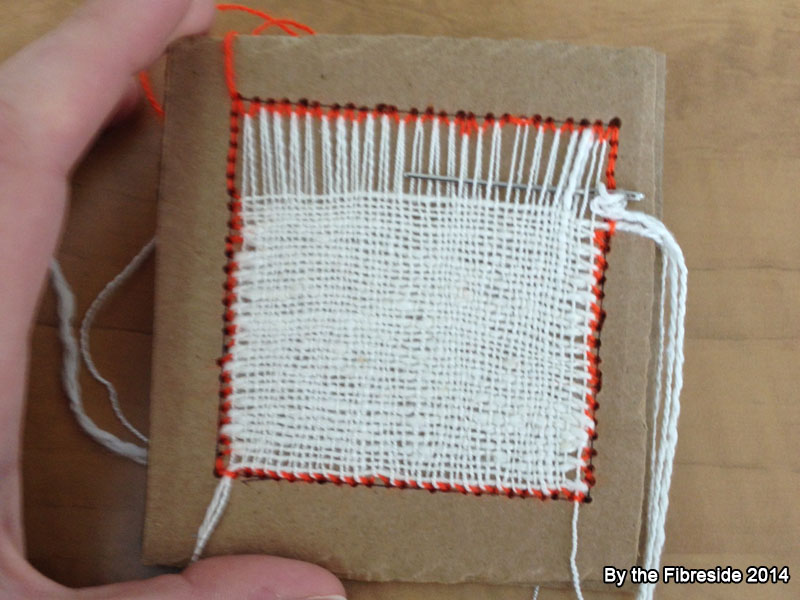
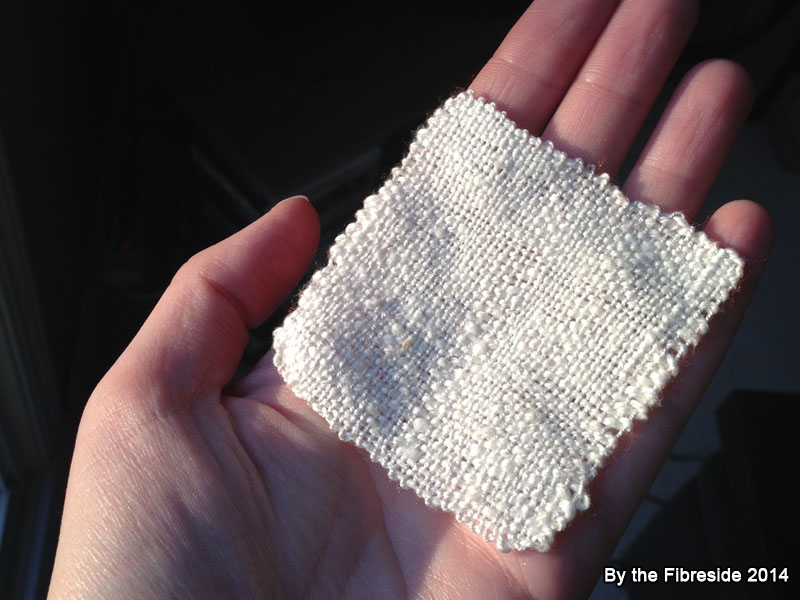
It’s taken me three days to weave this little swatch. The tension isn’t great, because really how do you regulate that, and my selvages are pretty bad too, since the acrylic stretched a bit and the corrugated cardboard collapsed, and beating the weft threads into place was… an interesting experience, but the more I wove, the more infatuated I became with the fabric.

The shiny, tightly spun warp threads. The textured mawata weft, still shiny but not as much. The cool hand after I had coaxed the weft into line and felt the fabric. The adorable rusticness of the whole thing, combined with the luxurious feel of silk.
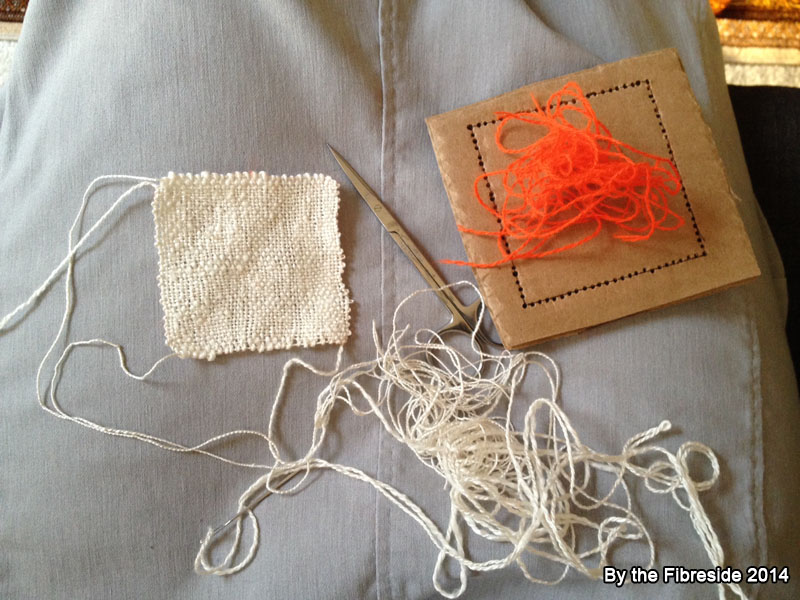
I would probably weave this way again. Not with corrugated cardboard and not with a short needle or with acrylic thread as the base, but it was fun, easy, portable, and best of all…

…did what I needed it to do. The swatch shrank a little once it was off the loom, but I’m not going to worry about that. It needs a wash, and then it’s ready for my Level 3 workbook. One down, more to go. I still need to find a place in the workbook for a three-ply silk noil skein, just because.